Sunday, 30 June 2019

ManageIQ Container on RHEL 7

The ManageIQ quick start provides instructions for using docker including the docker service. On RHEL 7 and 8 podman is the way to go for working with containers. For reference here is the original documentation I have adapted this guide from: http://manageiq.org/docs/get-started/docker

Get the RHEL 7 software for working with containers:

subscription-manager repos --enable=rhel-7-server-rpms --enable=rhel-7-server-extras-rpms --enable=rhel-7-server-optional-rpms
yum install podman

Download the ManageIQ container:

podman pull manageiq/manageiq:hammer-7

Start ManageIQ mapping port external port 8443 to the internal secure web server:

podman run -d -p 8443:443 manageiq/manageiq:hammer-7
firewall-cmd --add-port 8443/tcp

Connect to the ManageIQ Web UI:

firefox https://<container_host>:8443/

Written with StackEdit.

Monday, 6 May 2019

Building a RHEL Repo Container

Sonario: you want to go off grid AND network install packages from a known release?
Solution: Move the packages from RHEL ISO images and any other packages you require into a containerised web server.

This is a bit of forced use case with many many other great solutions but we are building custom images from scratch without the internet and I thought putting the repo server into a container would be a simple from scratch tutorial which readers can quickly adapt to their own thing. Better than hello world?

Configure Repositories

This example is based on RHEL 7.6 so I register and attach a subscription before we get down to business.

subscription-manager register
subscription-manager attach --pool <pool_id>

Repos for Container-ing

subscription-manager repos --enable=rhel-7-server-rpms --enable=rhel-7-server-extras-rpms --enable=rhel-7-server-optional-rpms

Building a From Scratch Container

yum install buildah runc podman
container_spud=$(buildah from scratch)
scratchmnt=$(buildah mount $container_spud)
rpm --root $scratchmnt --initdb
yum install yum-utils
yumdownloader --destdir=/tmp redhat-release-server
rpm --root $scratchmnt -ihv /tmp/redhat-release-server*.rpm

Add Web Server with Static Content

yum install -y --installroot=$scratchmnt httpd
rm $scratchmnt/var/www/html/index.html
mkdir /mnt/rhel_installation
mount -oro,loop rhel-server-7.6-x86_64-dvd.iso /mnt/rhel_installation
mkdir -p $scratchmnt/var/www/html/rpm_repos/rhel-server-7.6-x86_64-dvd
cp -av  /mnt/rhel_installation $scratchmnt/var/www/html/rpm_repos/rhel-server-7.6-x86_64-dvd

Create more directories and use the createrepo command from the createrepo package to turn a directory of RPMs into a proper YUM repository.

createrepo <directory>

Turn the buildah container into image for sharing and deployment.

buildah config --cmd "/usr/sbin/httpd -DFOREGROUND" $container_spud
buildah config --port 80/tcp $container_spud
buildah commit $container_spud spud_content_server:latest
podman images

Launch the RHEL Content Container.

podman run -p 8080:80 -d --name httpd-server <image_id>

Web browse to: http://<container_host>:8080/rpm_repos/rhel-server-7.6-x86_64-dvd/

RHEL hosts wanting to use the repository need a repo file in /etc/yum.repos.d/ similar to the following:

[RHEL76InstallMedia]  
name=Red Hat Enterprise Linux 7.6  
baseurl = http://<container_host>:8080/rpm_repos/rhel-server-7.6-x86_64-dvd/
metadata_expire=-1  
gpgcheck=0  

Written with StackEdit.
System Monitoring with PCP (Performance Co-pilot)

Configure Repositories

This example is based on RHEL 7.6 so I register and attach a subscription before we get down to business.

subscription-manager register
subscription-manager attach --pool <pool_id>

Install and Start Monitoring

The monitoring services start automatically upon installation but have them start at each boot you have to enable their services.

yum install pcp-zeroconf
systemctl enable pmcd pmlogger

Live Text Based Monitoring

Command Description
pcp atop Similar to “top”.
pcp atopsar Similar to “sar”.
pmrep -i eth0 -v network.interface.out Network outbound.

Live Web Based Monitoring

yum install pcp-webapi pcp-webjs
firewall-cmd --add-port 44323/tcp --permanent
firewall-cmd --reload
systemctl enable pmwebd
systemctl start pmwebd

Web browse to: http://<host>:44323/
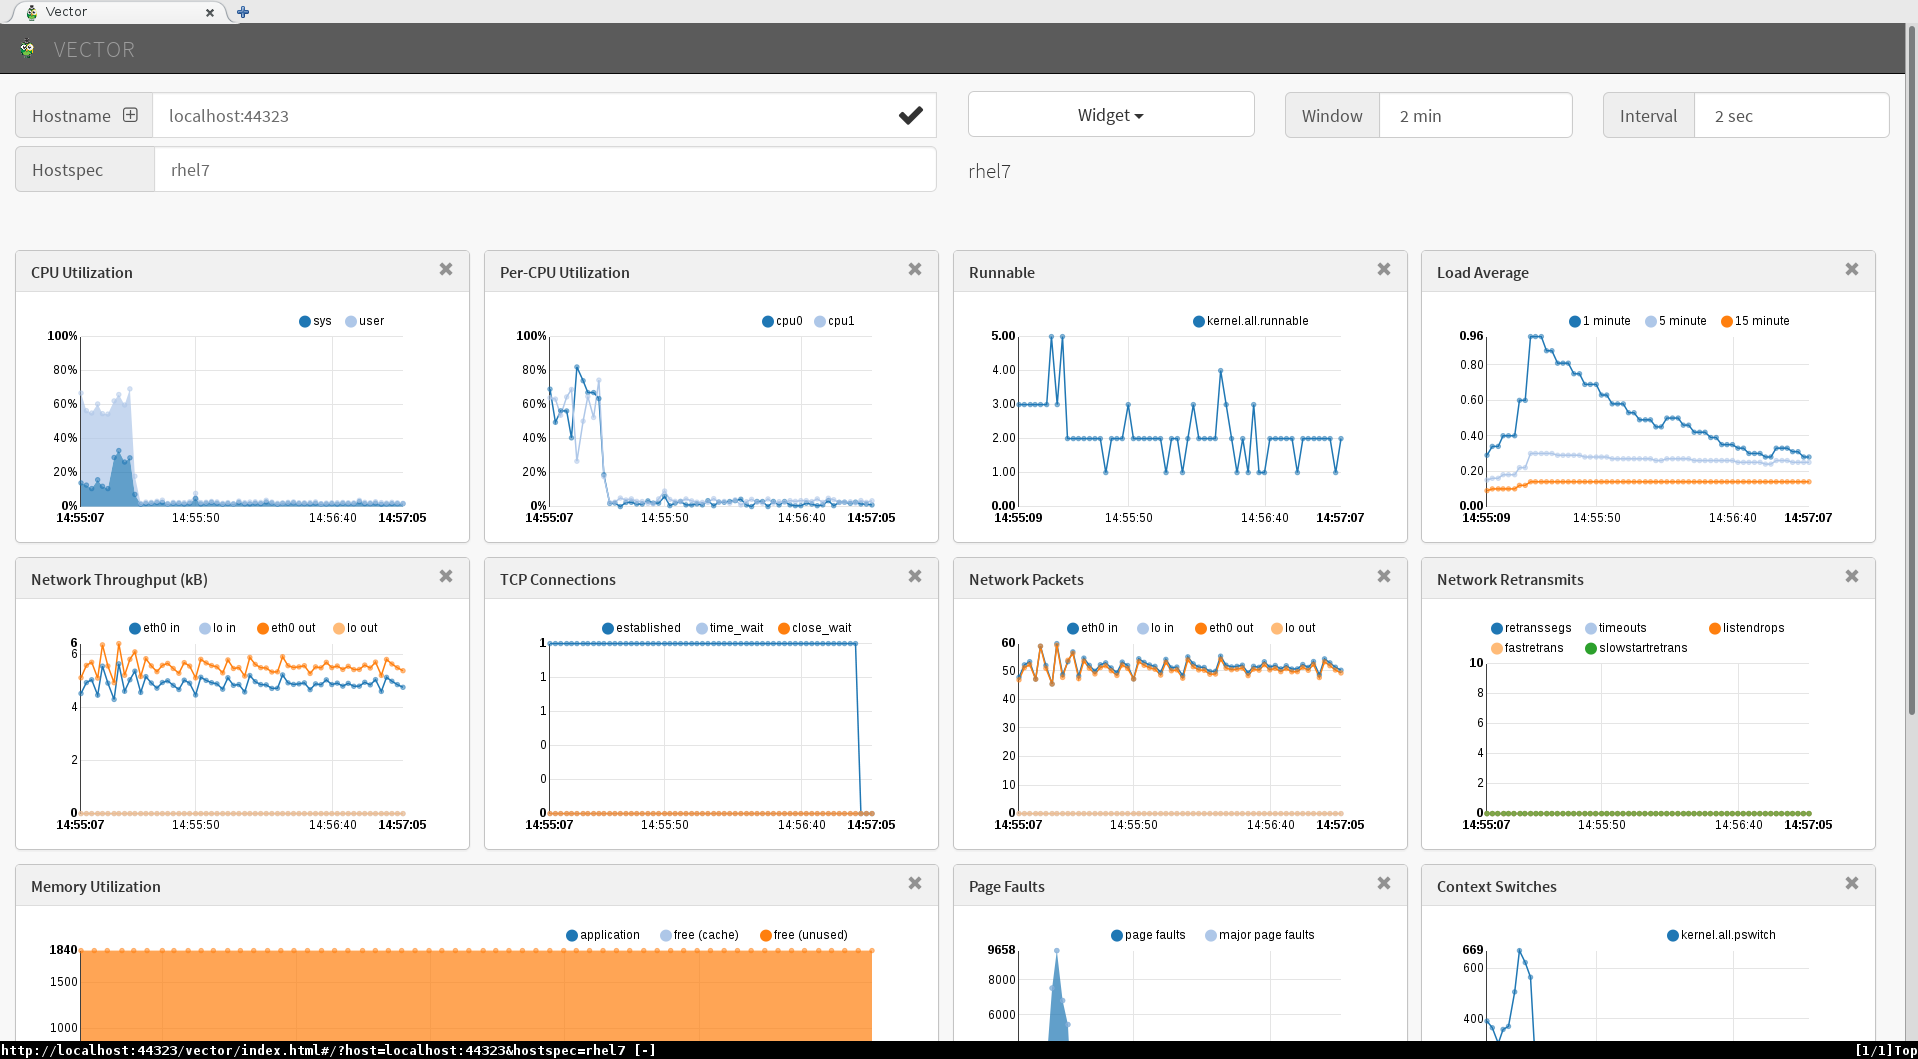
Explore the various web applications provided on the jump page. There are many and the following image shows “Vector”.
enter image description here

Copy logs for Later Analysis

Archive the PCP logs for attaching to your Red Hat support ticket.

tar cvJf pcp-logs_$(hostname)_$(date +%Y%m%d).tar.xz /var/log/pcp/

Written with StackEdit.

Sunday, 10 March 2019

Satellite 6.3 to 6.4 Upgrade

References:

For each Organisation in Satellite refresh their manifests.

Check what issues exist before upgrading. I had a couple of thousand old tasks which it offered to cleared out for me. I quit when it found I had to upgrade Puppet first.

foreman-maintain upgrade list-versions
foreman-maintain upgrade check --target-version 6.4

Upgrade Puppet on Satellite

 subscription-manager repos --enable=rhel-7-server-satellite-6.3-puppet4-rpms
 satellite-installer --upgrade-puppet

Replace the “JAVA_ARGS” variable withthe following in /etc/sysconfig/puppetserver:

 JAVA_ARGS="-Xms2G -Xmx2G -XX:MaxPermSize=256m -Djava.io.tmpdir=_/var/tmp_"

Add the following line to /etc/foreman-installer/custom-hiera.yaml:

 puppet::server_jvm_extra_args: '-XX:MaxPermSize=256m -Djava.io.tmpdir=_/var/tmp_'

Restart the Puppet server:

 systemctl restart puppetserver

Go back and re-check with foreman-maintain:

 foreman-maintain upgrade check --target-version 6.4 --whitelist="disk-performance"

All good, lets upgrade:

  foreman-maintain upgrade run --target-version 6.4 --whitelist="disk-performance"

Confirm with “y” at the next two questions that you wish to continue. It is reminding you to make a backup and that the next phase is going to change stuff!

Optional, install the OpenSCAP content:

 foreman-rake foreman_openscap:bulk_upload:default

Post Upgrade Tasks

Review the taks in the upgrade guide:

I chose to only do the “Removing the Previous Version of the Satellite Tools Repository” task for now.


Written with StackEdit.

NFS Setup Scripts

Red Hat provides a web tool to build custom scripts to configure your NFS server or client. Supply the information about your desired NFS service and then download the custom shell script.

Have a look around at the other tools while you are there.

Red Hat Customer Portal Labs – Developed by Red Hat engineers to help you improve performance, troubleshoot issues, identify security problems, and optimize configuration.


Written with StackEdit.

Wednesday, 20 February 2019

Bandwidth Limit Connections

Creating Classes of Network Traffic

…with RHEL 7

References:

Prioritisation of Outbound Network Traffic

Scenario

  1. Any class of traffic may consume all available bandwidth.

  2. If there are simultaneous competing traffic classes then:

  3. High priority traffic gets to use all the available bandwidth except what is guaranteed to the lower classes.

  4. Medium priority traffic gets its guaranteed rate. If there is no high priority traffic then the medium traffic will expand and consume the entire bandwidth available.

  5. Low priority traffic gets its guaranteed rate. Only when there is no high or medium priority traffic, the low priority traffic will expand and consume the entire bandwidth available.

  6. Low priority traffic classes will loose their additional allocation of bandwidth over their guaranteed bandwidth whenever there is higher priority traffic.

Solution Design

With RHEL 7 Traffic Control to create three classes of traffic:

  1. High priority

    • Application traffic
    • Services that directory support the application; dns, ldap, ntp.
  2. Medium priority (default class)

    • Infrastructure services; software updates via Red Hat Satellite.
    • Maintenance services; ssh.
  3. Low priority

    • Forwarding Logs

The maximum rate of high priority traffic and the ceiling for all three classes of traffic is being set to an unrealistically high number to ensure the server will use all available bandwidth. Just as what would happen if there were no traffic prioritisation rules. It is thought “900mbit” is an unrealistic rate for the target links we intend to use.

The “burst” attribute is used to adjust the responsiveness of maintaining adherence to the rates. The default will be used and the system will set a value which is a little sluggish/lazy but it should affect changes within seconds.

Limitations

  1. Only outbound traffic is being limited in this solution. Our focus is on controlling the uploading of “Log” traffic.

Implementation

The “Traffic Control” command “/usr/sbin/tc” comes with the “iproute” package.

Show the Traffic Classes

tc class show ens5
tc -s class show ens5
tc filter show dev ens5 parent 1:

Delete existing traffic control rules

tc qdisc delete dev ens5 root

Create the Traffic Classes and set the default class.

tc qdisc add dev ens5 root handle 1: htb default 20
tc class add dev ens5 parent 1: classid 1:1 htb rate 900mbit
tc class add dev ens5 parent 1:1 classid 1:10 htb rate 900mbit ceil 900mbit prio 1
tc class add dev ens5 parent 1:1 classid 1:20 htb rate 10mbit ceil 900mbit prio 2
tc class add dev ens5 parent 1:1 classid 1:30 htb rate 1kbit ceil 900mbit prio 3

Make the queue scheduling fair to minimise starvation when under heavy load.

tc qdisc add dev ens5 parent 1:10 handle 10: sfq perturb 10
tc qdisc add dev ens5 parent 1:20 handle 20: sfq perturb 10
tc qdisc add dev ens5 parent 1:30 handle 30: sfq perturb 10

Select traffic for the High priority class.

tc filter add dev ens5 parent 1: protocol ip u32 match ip dport 53 0xffff flowid 1:10
tc filter add dev ens5 parent 1: protocol ip u32 match ip dport 123 0xffff flowid 1:10
tc filter add dev ens5 parent 1: protocol ip u32 match ip dport 389 0xffff flowid 1:10
tc filter add dev ens5 parent 1: protocol ip u32 match ip dport <application_ports> 0xffff flowid 1:10

Select traffic for the Medium priority class.

tc filter add dev ens5 parent 1: protocol ip u32 match ip dport 22 0xffff flowid 1:20
tc filter add dev ens5 parent 1: protocol ip u32 match ip dst <satellite> 0xffff flowid 1:20

Select traffic for the Low priority class.

tc filter add dev ens5 parent 1: protocol ip u32 match ip dport 514 0xffff flowid 1:30

Written with StackEdit.

Tips for libvirt

Tips for libvirt

Connecting to a Remote and NAT-ed Hypervisor

I don’t know how but not only did virt-manager control the remote libvirtd hypervisor but VNC graphical console was also forwarded over the SSH tunnel
Prerequisits:

  • RHEL 7
  • root user is not permitted SSH login.

Remote Internet Router:

  • enable SSH port forwarding from the remote Internet router to the remote hypervisor.

Remote Hypervisor:

Uncomment the following 2 lines in /etc/libvirt/libvirtd.conf

unix_sock_group = "libvirt"  
unix_sock_rw_perms = "0770"
systemctl restart libvirtd

Local Graphical Desktop
Load you SSH key for the remote account and test connectivity:

ssh-add <ssh_private_key>
ssh -p <port> <user>@<ip>

Close the SSH session if you want to when you are happy it works correctly.

Start virt-manager with a connection to the remote hypervisor:

  • virt-manager -c qemu+ssh://@:/system

Written with StackEdit.