Saturday, 17 September 2022

Launching RHEL 8 Cloud Image on Libvirt

Launching RHEL 8 Cloud Image on Libvirt

Bring the speed of provisioning from pre-built cloud images to your Libvirt/KVM hypervisor.

Go here: https://access.redhat.com/downloads/content/479/ver=/rhel—8/8.6/x86_64/product-software and download Red Hat Enterprise Linux 8.6 KVM Guest Image. It is 794MB.

Execute the following and you will be prompted for a password to turn into a SHA512 password hash, if you want to use passwords instead of an SSH key.

python -c 'import crypt,getpass; print(crypt.crypt(getpass.getpass(), crypt.mksalt(crypt.METHOD_SHA512)))'

Create a cloud-init Configuration YAML file. The first line must start with “#cloud-config”.

vim config.yaml

(Note that the default user “cloud-user” and SSH password authentication is disabled in the example below.)

#cloud-config  
#password: 1800redhat
#chpasswd: { expire: False }  
ssh_pwauth: False  
hostname: rhel86.the.lab  
#package_upgrade: true  
users:  
- name: spud
groups: wheel  
lock_passwd: false  
passwd: <password_hash>  
shell: /bin/bash  
sudo: ['ALL=(ALL) NOPASSWD:ALL']  
ssh-authorized-keys:  
- <ssh_public_key>

Build the cloud-init ISO image. At the time of writing there is no official cloud-utils package for RHEL 8 so recommend borrowing/installing from Fedora 36 if you are using RHEL 8.

dnf install https://download-ib01.fedoraproject.org/pub/fedora/linux/releases/36/Everything/x86_64/os/Packages/c/cloud-utils-0.31-10.fc36.noarch.rpm

dnf install cloud-utils
# OR the above URL for RHEL 8.

cloud-localds config.iso config.yaml

Clone the RHEL 8 cloud image to create a disk for your VM. Move/copy the ISO as well to a storage location libvirtd can access:

sudo install --owner qemu --group qemu --mode 0600 rhel-8.0-x86_64-kvm.qcow2 /var/lib/libvirt/images/rhel86-vm1.qcow2
sudo install --owner qemu --group qemu --mode 0400 config.iso /var/lib/libvirt/images/rhel86-vm1.iso

Provision the VM.

virt-install --memory 4096 --vcpus 1 --name rhel8-vm1 --disk /var/lib/libvirt/images/rhel86-vm1.qcow2,device=disk --disk /var/lib/libvirt/images/rhel86-vm1.iso,device=cdrom --os-type Linux --os-variant rhel8.6 --virt-type kvm --graphics none --import --network bridge=virbr0 --memballoon driver.iommu=on --rng /dev/random,driver.iommu=on

virt-install automatically attaches to the serial console of the VM so you can see it booting. To exit the console use <Ctrl>+<]>, just like telnet from the olden days.

Login with the user and password combination: cloud-user / 1800redhat

Red Hat Enterprise Linux 8.6 (Ootpa) 
Kernel 4.18.0-372.9.1.el8.x86_64 on an x86_64 

Activate the web console with: systemctl enable --now cockpit.socket 
localhost login: cloud-user 
Password: 
Last login: Fri Sep 16 20:21:18 on ttyS0 

# Switch to root, enable cockpit and determine the ip address of the VM, (eg. 192.168.122.227) 

[cloud-user@localhost ~]$ sudo -i 
[root@localhost ~]# systemctl enable --now cockpit.socket 
Created symlink /etc/systemd/system/sockets.target.wants/cockpit.socket → /usr/lib/systemd/system/cockpit.socket. 
[root@localhost ~]# ip a show eth0 
2: eth0: <BROADCAST,MULTICAST,UP,LOWER_UP> mtu 1500 qdisc fq_codel state UP group default qlen 1000 
    link/ether 52:54:00:a2:60:ee brd ff:ff:ff:ff:ff:ff 
    inet 192.168.122.227/24 brd 192.168.122.255 scope global dynamic noprefixroute eth0 
       valid_lft 2771sec preferred_lft 2771sec 
    inet6 fe80::e2bd:c725:232b:fd0e/64 scope link noprefixroute
       valid_lft forever preferred_lft forever 

In a web browser on your laptop go to: https://<ipaddress>:9090/
In the example above the IP address is on the “inet” line and is 192.168.122.227 (leave out the “/24” which signifies the netmask and is not part of the IP address)

Login again with: cloud-user / 1800redhat

To exit that text console that “virt-install” put you into press the keys <Ctrl>+<]>

You can ssh to the VM using: ssh cloud-user@<ip_address>

Change the VM’s hostname if necessary:
hostnamctl set-hostname <new_hostname>

Shutdown the VM to commence resizing the disk to something bigger than the default 10GB.
shutdown now

On your hypervisor enlarge the virtual disk. The example below makes the disk 150GB:
qemu-img resize /var/lib/libvirt/images/rhel86-vm1.qcow2 150G

Start the VM:
virsh start rhel8-vm1

At this stage cockpit does not have the storage plugin installed so CLI it is:

$ ssh cloud-user@192.168.122.227
[cloud-user@localhost ~]$ lsblk
NAME   MAJ:MIN RM   SIZE RO TYPE MOUNTPOINT
sr0     11:0    1   366K  0 rom  
vda    252:0    0   150G  0 disk 
├─vda1 252:1    0     1M  0 part 
├─vda2 252:2    0   100M  0 part /boot/efi
└─vda3 252:3    0 149.9G  0 part /
[cloud-user@localhost ~]$ df -h
Filesystem      Size  Used Avail Use% Mounted on
devtmpfs        7.7G     0  7.7G   0% /dev
tmpfs           7.8G     0  7.8G   0% /dev/shm
tmpfs           7.8G   17M  7.7G   1% /run
tmpfs           7.8G     0  7.8G   0% /sys/fs/cgroup
/dev/vda3       150G  3.0G  147G   2% /
/dev/vda2       100M  5.8M   95M   6% /boot/efi
tmpfs           1.6G     0  1.6G   0% /run/user/1000

Note that cloud-init automatically resized the partition /dev/vda3 and root / filesystem to use all of the new storage automatically on boot.

Written with StackEdit.

Sunday, 26 September 2021

Building a Storj Node on CentOS

--- ---

Building a Storj Node on CentOS

Be the decentralized cloud. Contribute your own storage node. https://www.storj.io/node

Storj is an S3-compatible platform and suite of decentralized applications that allows you to store data in a secure and decentralized manner. The more bandwidth and the more storage your make available, the more you get paid.

The Linux install uses a Docker Container. I and others appear to fail to simply replace Docker with Podman. For my first successful attempt I went with CentOS with a view to move to Podman and finally RHEL 8 Podman. This guide documents my first successful attempt and uses CentOS with Docker.

References:

Requirements

https://docs.storj.io/node/before-you-begin/prerequisites

  • Storage:
    • / 8GB
    • /home 552GB (500GB + 10% overhead) {Storej} + user files
  • CPU: 1
  • RAM: 2GB
  • OS: CentOS 8 Server - minimal install

Procedure

I am going to recommend a different order for setup to make it more streamline / linear in process. Skip creating an “Identity” until after Docker is installed and the unprivileged user (eg. storj) has been created.

Setup all the Things Outside the Storj Node

Get setup with an identity at STORJ: https://www.storj.io/host-a-node
The fourth step is installing the “CLI”. It will help you cover off the prerequisites. Reminder that depending on your firewall you might need to define both:

  1. NAT / Port Forward and
  2. Firewall rule to allow the port forward, doh!

Docker Installation

Pick you Linux Distro https://docs.storj.io/node/setup/cli/docker
Or go straight to the Docker CentOS instrucitons: https://docs.docker.com/engine/install/centos/

yum update
reboot
yum remove docker docker-client docker-client-latest docker-common docker-latest docker-latest-logrotate docker-logrotate docker-engine
yum install -y yum-utils
yum-config-manager --add-repo https://download.docker.com/linux/centos/docker-ce.repo
yum install docker-ce docker-ce-cli containerd.io
systemctl start docker
docker run hello-world

groupadd docker
systemctl enable docker.service
systemctl enable containerd.service
cat >> /etc/docker/daemon.json <EOT
{
  "log-driver": "local",
  "log-opts": {
    "max-size": "10m"
  }
}
EOT

firewall-cmd --add-port 28967/udp --add-port 28967/tcp
firewall-cmd --add-port 28967/udp --add-port 28967/tcp --permanent
sysctl -w net.core.rmem_max=2500000
echo "net.core.rmem_max=2500000" >> /etc/sysctl.conf

Create an Unprivilleged Account for the Node Software

useradd -m -G docker storj
su - storj
# Check Docker works.
docker run hello-world

Create a Storj Identity

https://docs.storj.io/node/dependencies/identity

Install Storj Node Software

docker pull storjlabs/storagenode:latest
mkdir /home/storj/storj_node_disk
docker run --rm -e SETUP="true" \
    --mount type=bind,source="/home/storj/.local/share/storj/identity/storagenode",destination=/app/identity \
    --mount type=bind,source="/home/storj/storj_node_disk",destination=/app/config \
    --name storagenode storjlabs/storagenode:latest

First Time Start

docker run -d --restart unless-stopped --stop-timeout 300 \
-p 28967:28967/tcp -p 28967:28967/udp -p 127.0.0.1:14002:14002 \
-e WALLET="0x0000000000000000000000000000000000000000" \
-e EMAIL="your@email.com" \
-e ADDRESS="<Internet_fqdn>:28967" \
-e STORAGE="500GB" \
--mount type=bind,source="/home/storj/.local/share/storj/identity/storagenode",destination=/app/identity \
--mount type=bind,source="/home/storj/storj_node_disk",destination=/app/config \
--name storagenode storjlabs/storagenode:latest

Common Commands

docker logs storagenode
docker stop -t 300 storagenode
docker start storagenode

Dashboards

CLI

docker exec -it storagenode /app/dashboard.sh

Web
The command above that started the Storj software limited the Web UI to localhost. For the paranoid, establish an SSH tunnel that port forwards to 14002 on the storj host. This will probably mean enabling SSH port forwarding and restarting SSH.

ssh -L 127.0.0.1:14002:127.0.0.1:14002 root@<storj_host>

Web browse to http://127.0.0.1:14002/

Written with StackEdit.

Sunday, 26 April 2020

Tiny Rsyslog Container Service

Using buildah we can create tiny containers.  Consider a RHEL 7 Rsyslog central logging service in a 164MB container, without doing crazy unsupported stuff.

Why?  Because containers should be:
  • tiny, minimal attack service and resource friendly;
  • easy to rebuild, infrastructure as code;
Environments disconnected from the Internet present challenges to mirror and maintain updated base container images.  The "From Scratch" style of container images means those environments can leverage existing YUM repositories to build and rebuild up-to-date images.

Below is a Bash shell script to build the Rsyslog container for you.  The script includes instructions on how to test and clean up the containers and images afterwards.  It also includes two different sets of "run" commands that:
  • leaves the collected logs inside the container, not very useful but simple.
  • exposes the collected logs through a volume which bind mounts between the container and its host.

#!/bin/bash

# Prerequisits:
#   * RHEL 7 server or similar.  Tested with RHEL 7 Server.
#   * buildah package to build the image.
#   * podman package to test the image.
#   * Run this script as the root user.

# Install the required software on RHEL 7 host.
# ---------------------------------------------
# subscription-manager repos --enable=rhel-7-server-rpms --enable=rhel-7-server-extras-rpms --enable=rhel-7-server-optional-rpms
# yum install buildah podman

# Author: spuddidit
# Date:  24/4/2020

# Default values for arguments.
imageName='spud_rsyslog'
port=5140


Usage () {
  echo "Usage:  $0 [ -h ] [ -n IMAGE_NAME ] [ -p PORT ]"
  echo "Options:"
  echo -e "\t-h\t\tDisplay this help message."
  echo -e "\t-n IMAGE_NAME\tContainer Image name. (Default: $imageName)"
  echo -e "\t-p PORT\t\tPort rsyslog will listen for TCP & UDP. (Default: $port)"
  echo ""
  exit 1
}


# if [ $# -eq 0 ]; then
#   Usage
# fi

while getopts "hn:p:" opt; do
  case ${opt} in
    h )
      Usage
      ;;
    n )
      imageName=$OPTARG
      ;;
    p )
      port=$OPTARG
      ;;
    \? )
      echo "Invalid option: $OPTARG" 1>&2
      ;;
    : )
      echo "Invalid option: $OPTARG requires an argument" 1>&2
      ;;
  esac
done
shift $((OPTIND -1))


echo 'Create a "from scratch" image.'
container=$(buildah from scratch)
echo 'Mount "from scratch" image.'
scratchmnt=$(buildah mount $container)

echo 'Install the packages:'
#echo -e '\tredhat-release'
echo -e '\trsyslog'
#yum install -y --releasever=7 --installroot=$scratchmnt redhat-release
# install_weak_deps option is not supported in RHEL 7???
# --setopt install_weak_deps=false
yum install -y --quiet --releasever=7 --setopt=reposdir=/etc/yum.repos.d \
            --installroot=$scratchmnt --setopt=cachedir=/var/cache/yum \
            --setopt=override_install_langs=en --setopt=tsflags=nodocs \
            rsyslog #redhat-release

echo 'Configure rsyslog service to receive logs from other hosts.'
cat >$scratchmnt/etc/rsyslog.conf <<EOT
\$ModLoad imudp
\$UDPServerRun ${port}

# Provides TCP syslog reception
\$ModLoad imtcp
\$InputTCPServerRun ${port}


\$template RemoteLogs,"/var/log/remote/%fromhost%_%fromhost-ip%_%PROGRAMNAME%.log"
*.* ?RemoteLogs
& ~
EOT


# :source, !isequal, "localhost" -?RemoteLogs
# :source, isequal, "last" ~


echo 'Cleanup inside the container.'
yum clean all -y --installroot $scratchmnt --releasever 7


echo 'Set the start command.'
buildah config --cmd "/usr/sbin/rsyslogd -n" $container
echo "Set listeners on UDP & TCP ports:  ${port}"
buildah config --port ${port}/tcp $container
buildah config --port ${port}/udp $container
echo "Create an image from the build container."
buildah commit --rm $container ${imageName}:latest

echo -e '\nList all images and highlight the new one.'
echo      '------------------------------------------'
podman images | grep --color -e "${imageName}" -e '^'
echo ''

image_id=$(podman images --quiet --filter reference=$imageName)
cat <<EOT
## Start the Logger Container *without* a Volume

    container=\$(podman run -p 5140:5140 -p 5140:5140/udp -d --name spud-syslog $image_id)

## --OR--  Start the Logger Container *with* a Volume

    container=\$(podman run --volume remote_logs:/var/log/remote -p 5140:5140 -p 5140:5140/udp -d --name spud-syslog $image_id)
    logger_dir=\$(podman inspect \$container | grep remote_logs | grep Source | cut -d\" -f4)


## Send a Message to the Containerised System Logger

    logger -n 127.0.0.1 -P 5140 "andrew was here 2."

## ... *without* a volume - Attach to a Container with a Shell and look at logs.

    podman exec -it --latest /bin/bash
    find /var/log/remote -type f -exec cat {} \;
    exit

## ... -OR - *with* a volume - access the logs from the container host.
    find \$logger_dir -type f -ls


## Cleanup
    podman stop --latest
    podman rm --latest
    podman rmi $image_id

EOT


Sunday, 30 June 2019

ManageIQ Container on RHEL 7

The ManageIQ quick start provides instructions for using docker including the docker service. On RHEL 7 and 8 podman is the way to go for working with containers. For reference here is the original documentation I have adapted this guide from: http://manageiq.org/docs/get-started/docker

Get the RHEL 7 software for working with containers:

subscription-manager repos --enable=rhel-7-server-rpms --enable=rhel-7-server-extras-rpms --enable=rhel-7-server-optional-rpms
yum install podman

Download the ManageIQ container:

podman pull manageiq/manageiq:hammer-7

Start ManageIQ mapping port external port 8443 to the internal secure web server:

podman run -d -p 8443:443 manageiq/manageiq:hammer-7
firewall-cmd --add-port 8443/tcp

Connect to the ManageIQ Web UI:

firefox https://<container_host>:8443/

Written with StackEdit.

Monday, 6 May 2019

Building a RHEL Repo Container

Sonario: you want to go off grid AND network install packages from a known release?
Solution: Move the packages from RHEL ISO images and any other packages you require into a containerised web server.

This is a bit of forced use case with many many other great solutions but we are building custom images from scratch without the internet and I thought putting the repo server into a container would be a simple from scratch tutorial which readers can quickly adapt to their own thing. Better than hello world?

Configure Repositories

This example is based on RHEL 7.6 so I register and attach a subscription before we get down to business.

subscription-manager register
subscription-manager attach --pool <pool_id>

Repos for Container-ing

subscription-manager repos --enable=rhel-7-server-rpms --enable=rhel-7-server-extras-rpms --enable=rhel-7-server-optional-rpms

Building a From Scratch Container

yum install buildah runc podman
container_spud=$(buildah from scratch)
scratchmnt=$(buildah mount $container_spud)
rpm --root $scratchmnt --initdb
yum install yum-utils
yumdownloader --destdir=/tmp redhat-release-server
rpm --root $scratchmnt -ihv /tmp/redhat-release-server*.rpm

Add Web Server with Static Content

yum install -y --installroot=$scratchmnt httpd
rm $scratchmnt/var/www/html/index.html
mkdir /mnt/rhel_installation
mount -oro,loop rhel-server-7.6-x86_64-dvd.iso /mnt/rhel_installation
mkdir -p $scratchmnt/var/www/html/rpm_repos/rhel-server-7.6-x86_64-dvd
cp -av  /mnt/rhel_installation $scratchmnt/var/www/html/rpm_repos/rhel-server-7.6-x86_64-dvd

Create more directories and use the createrepo command from the createrepo package to turn a directory of RPMs into a proper YUM repository.

createrepo <directory>

Turn the buildah container into image for sharing and deployment.

buildah config --cmd "/usr/sbin/httpd -DFOREGROUND" $container_spud
buildah config --port 80/tcp $container_spud
buildah commit $container_spud spud_content_server:latest
podman images

Launch the RHEL Content Container.

podman run -p 8080:80 -d --name httpd-server <image_id>

Web browse to: http://<container_host>:8080/rpm_repos/rhel-server-7.6-x86_64-dvd/

RHEL hosts wanting to use the repository need a repo file in /etc/yum.repos.d/ similar to the following:

[RHEL76InstallMedia]  
name=Red Hat Enterprise Linux 7.6  
baseurl = http://<container_host>:8080/rpm_repos/rhel-server-7.6-x86_64-dvd/
metadata_expire=-1  
gpgcheck=0  

Written with StackEdit.

System Monitoring with PCP (Performance Co-pilot)

Configure Repositories

This example is based on RHEL 7.6 so I register and attach a subscription before we get down to business.

subscription-manager register
subscription-manager attach --pool <pool_id>

Install and Start Monitoring

The monitoring services start automatically upon installation but have them start at each boot you have to enable their services.

yum install pcp-zeroconf
systemctl enable pmcd pmlogger

Live Text Based Monitoring

Command Description
pcp atop Similar to “top”.
pcp atopsar Similar to “sar”.
pmrep -i eth0 -v network.interface.out Network outbound.

Live Web Based Monitoring

yum install pcp-webapi pcp-webjs
firewall-cmd --add-port 44323/tcp --permanent
firewall-cmd --reload
systemctl enable pmwebd
systemctl start pmwebd

Web browse to: http://<host>:44323/
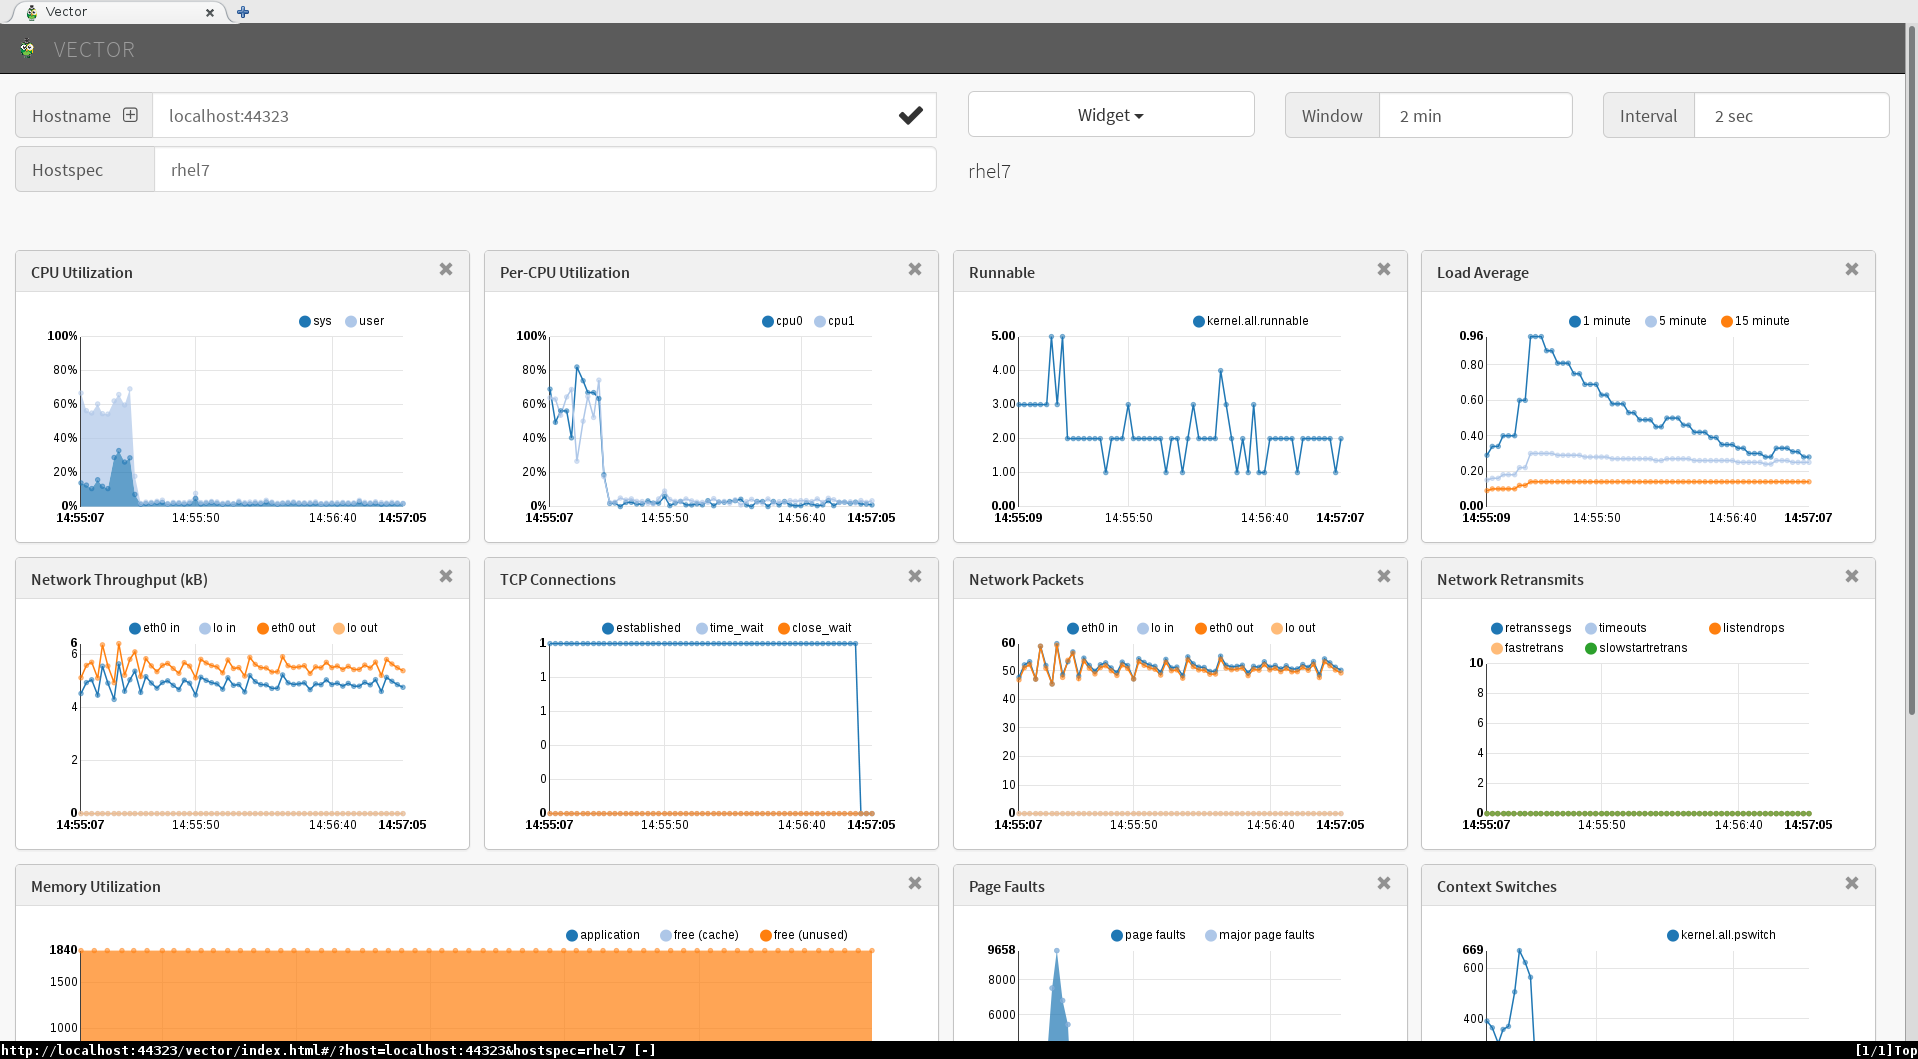
Explore the various web applications provided on the jump page. There are many and the following image shows “Vector”.
enter image description here

Copy logs for Later Analysis

Archive the PCP logs for attaching to your Red Hat support ticket.

tar cvJf pcp-logs_$(hostname)_$(date +%Y%m%d).tar.xz /var/log/pcp/

Written with StackEdit.

Sunday, 10 March 2019

Satellite 6.3 to 6.4 Upgrade

References:

For each Organisation in Satellite refresh their manifests.

Check what issues exist before upgrading. I had a couple of thousand old tasks which it offered to cleared out for me. I quit when it found I had to upgrade Puppet first.

foreman-maintain upgrade list-versions
foreman-maintain upgrade check --target-version 6.4

Upgrade Puppet on Satellite

 subscription-manager repos --enable=rhel-7-server-satellite-6.3-puppet4-rpms
 satellite-installer --upgrade-puppet

Replace the “JAVA_ARGS” variable withthe following in /etc/sysconfig/puppetserver:

 JAVA_ARGS="-Xms2G -Xmx2G -XX:MaxPermSize=256m -Djava.io.tmpdir=_/var/tmp_"

Add the following line to /etc/foreman-installer/custom-hiera.yaml:

 puppet::server_jvm_extra_args: '-XX:MaxPermSize=256m -Djava.io.tmpdir=_/var/tmp_'

Restart the Puppet server:

 systemctl restart puppetserver

Go back and re-check with foreman-maintain:

 foreman-maintain upgrade check --target-version 6.4 --whitelist="disk-performance"

All good, lets upgrade:

  foreman-maintain upgrade run --target-version 6.4 --whitelist="disk-performance"

Confirm with “y” at the next two questions that you wish to continue. It is reminding you to make a backup and that the next phase is going to change stuff!

Optional, install the OpenSCAP content:

 foreman-rake foreman_openscap:bulk_upload:default

Post Upgrade Tasks

Review the taks in the upgrade guide:

I chose to only do the “Removing the Previous Version of the Satellite Tools Repository” task for now.


Written with StackEdit.

NFS Setup Scripts

Red Hat provides a web tool to build custom scripts to configure your NFS server or client. Supply the information about your desired NFS service and then download the custom shell script.

Have a look around at the other tools while you are there.

Red Hat Customer Portal Labs – Developed by Red Hat engineers to help you improve performance, troubleshoot issues, identify security problems, and optimize configuration.


Written with StackEdit.

Wednesday, 20 February 2019

Bandwidth Limit Connections

Creating Classes of Network Traffic

…with RHEL 7

References:

Prioritisation of Outbound Network Traffic

Scenario

  1. Any class of traffic may consume all available bandwidth.

  2. If there are simultaneous competing traffic classes then:

  3. High priority traffic gets to use all the available bandwidth except what is guaranteed to the lower classes.

  4. Medium priority traffic gets its guaranteed rate. If there is no high priority traffic then the medium traffic will expand and consume the entire bandwidth available.

  5. Low priority traffic gets its guaranteed rate. Only when there is no high or medium priority traffic, the low priority traffic will expand and consume the entire bandwidth available.

  6. Low priority traffic classes will loose their additional allocation of bandwidth over their guaranteed bandwidth whenever there is higher priority traffic.

Solution Design

With RHEL 7 Traffic Control to create three classes of traffic:

  1. High priority

    • Application traffic
    • Services that directory support the application; dns, ldap, ntp.
  2. Medium priority (default class)

    • Infrastructure services; software updates via Red Hat Satellite.
    • Maintenance services; ssh.
  3. Low priority

    • Forwarding Logs

The maximum rate of high priority traffic and the ceiling for all three classes of traffic is being set to an unrealistically high number to ensure the server will use all available bandwidth. Just as what would happen if there were no traffic prioritisation rules. It is thought “900mbit” is an unrealistic rate for the target links we intend to use.

The “burst” attribute is used to adjust the responsiveness of maintaining adherence to the rates. The default will be used and the system will set a value which is a little sluggish/lazy but it should affect changes within seconds.

Limitations

  1. Only outbound traffic is being limited in this solution. Our focus is on controlling the uploading of “Log” traffic.

Implementation

The “Traffic Control” command “/usr/sbin/tc” comes with the “iproute” package.

Show the Traffic Classes

tc class show ens5
tc -s class show ens5
tc filter show dev ens5 parent 1:

Delete existing traffic control rules

tc qdisc delete dev ens5 root

Create the Traffic Classes and set the default class.

tc qdisc add dev ens5 root handle 1: htb default 20
tc class add dev ens5 parent 1: classid 1:1 htb rate 900mbit
tc class add dev ens5 parent 1:1 classid 1:10 htb rate 900mbit ceil 900mbit prio 1
tc class add dev ens5 parent 1:1 classid 1:20 htb rate 10mbit ceil 900mbit prio 2
tc class add dev ens5 parent 1:1 classid 1:30 htb rate 1kbit ceil 900mbit prio 3

Make the queue scheduling fair to minimise starvation when under heavy load.

tc qdisc add dev ens5 parent 1:10 handle 10: sfq perturb 10
tc qdisc add dev ens5 parent 1:20 handle 20: sfq perturb 10
tc qdisc add dev ens5 parent 1:30 handle 30: sfq perturb 10

Select traffic for the High priority class.

tc filter add dev ens5 parent 1: protocol ip u32 match ip dport 53 0xffff flowid 1:10
tc filter add dev ens5 parent 1: protocol ip u32 match ip dport 123 0xffff flowid 1:10
tc filter add dev ens5 parent 1: protocol ip u32 match ip dport 389 0xffff flowid 1:10
tc filter add dev ens5 parent 1: protocol ip u32 match ip dport <application_ports> 0xffff flowid 1:10

Select traffic for the Medium priority class.

tc filter add dev ens5 parent 1: protocol ip u32 match ip dport 22 0xffff flowid 1:20
tc filter add dev ens5 parent 1: protocol ip u32 match ip dst <satellite> 0xffff flowid 1:20

Select traffic for the Low priority class.

tc filter add dev ens5 parent 1: protocol ip u32 match ip dport 514 0xffff flowid 1:30

Written with StackEdit.

Tips for libvirt

Tips for libvirt

Connecting to a Remote and NAT-ed Hypervisor

I don’t know how but not only did virt-manager control the remote libvirtd hypervisor but VNC graphical console was also forwarded over the SSH tunnel
Prerequisits:

  • RHEL 7
  • root user is not permitted SSH login.

Remote Internet Router:

  • enable SSH port forwarding from the remote Internet router to the remote hypervisor.

Remote Hypervisor:

Uncomment the following 2 lines in /etc/libvirt/libvirtd.conf

unix_sock_group = "libvirt"  
unix_sock_rw_perms = "0770"
systemctl restart libvirtd

Local Graphical Desktop
Load you SSH key for the remote account and test connectivity:

ssh-add <ssh_private_key>
ssh -p <port> <user>@<ip>

Close the SSH session if you want to when you are happy it works correctly.

Start virt-manager with a connection to the remote hypervisor:

  • virt-manager -c qemu+ssh://@:/system

Written with StackEdit.

Saturday, 28 July 2018

Start Stop Zoneminder with systemd timers

Zoneminder records forever as soon as it starts.  For me, I only wanted the backyard monitored in the afternoon/evenings.  This gets real easy as I am using the webcam built into an old laptop running on RHEL 7.

# cat /usr/lib/systemd/system/zoneminder.timer
[Unit]
Description=Start the zoneminder service each day.

[Timer]
OnCalendar=*-*-* 16:00:00
AccuracySec=24h
Persistent=true

[Install]
WantedBy=timers.target


# cat /usr/lib/systemd/system/zoneminder.service
# ZoneMinder systemd unit file for CentOS 7

[Unit]
Description=ZoneMinder CCTV recording and security system
After=network.target mariadb.service httpd.service
Requires=mariadb.service httpd.service
Conflicts=zoneminder-off.service
[Service]
User=apache
Group=apache
Type=forking
ExecStart=/usr/bin/zmpkg.pl start
ExecReload=/usr/bin/zmpkg.pl restart
ExecStop=/usr/bin/zmpkg.pl stop
PIDFile=/var/run/zoneminder/zm.pid
Environment=TZ=/etc/localtime
RuntimeDirectory=zoneminder
RuntimeDirectoryMode=0755

[Install]
WantedBy=multi-user.target

# cat /usr/lib/systemd/system/zoneminder-off.timer
[Unit]
Description=Stop the zoneminder service each day.

[Timer]
OnCalendar=*-*-* 23:00:00
AccuracySec=24h
Persistent=true

[Install]
WantedBy=timers.target


# cat /usr/lib/systemd/system/zoneminder-off.service
[Unit]Description=Conflict service to cause ZoneMinder to shutdown.

[Service]
Type=oneshot
ExecStart=/bin/echo 'Starting zoneminder-off should shutdown zoneminder.'
ExecReload=/bin/echo 'Reloading zoneminder-off does nothing.'
ExecStop=/bin/echo 'Stopping zoneminder-off does nothing as it is oneshot.'
PIDFile=/var/run/zoneminder/zm-off.pid

[Install]
WantedBy=multi-user.target


# systemctl daemon-reload
# system enable zoneminder.timer zoneminder.service zoneminder-off.timer zoneminder-off.service
# systemctl start zoneminder.timer zoneminder-off.timer

Friday, 29 December 2017

pfSense vs Game Consoles

pfSense's NAT is a bit too secure for games consoles such as PS3, PS4, Wii-U and Switch.  It is pfSense's default behavior of randomising the outbound ports that is confusing some of our network orientated games.

Reference:
  • https://forum.pfsense.org/index.php?topic=126746.0

Create an Outbound NAT Entry

I have five gaming consoles so I have assigned static IPs to each (via DHCP static mappings) and created an individual outbound port rule for each console.  The must do aspect is ticking the Static Port option when creating the rule.
By creating specific rules for the game console the connections from other devices in the house (TVs, computers, smart devices) continue to be randomised.

Review the OutBound NAT Entries

Note the tick for each console in the Static Port column. 


UPNP is not Required


UPNP appears to be a distraction in the forums and is not required in my experience.  Set up UPNP access for use by specific devices only:
  • https://www.reddit.com/r/PFSENSE/comments/2uc645/need_help_getting_open_nat_on_ps4/

Wednesday, 27 December 2017

Configure Bash Prompt for Git

 git-prompt.sh script shipped with the git package. Add the following lines to your ~/.bashrc file.


source /usr/share/git-core/contrib/completion/git-prompt.sh
export GIT_PS1_SHOWDIRTYSTATE=true
export GIT_PS1_SHOWUNTRACKEDFILES=true
export PS1='[\u@\h \W$(declare -F __git_ps1 &>/dev/null && __git_ps1 " (%s)")]\$ '

For a fancy coloured prompt try this:export $PS1='\[\033[0;32m\]✔\[\033[0;0m\] \[\033[0;33m\]\w\[\033[0;0m\] [\[\033[0;35m\]${GIT_BRANCH}\[\033[0;0m\]|\[\033[0;34m\]✚ 10\[\033[0;0m\]\[\033[0;36m\]…26\[\033[0;0m\]\[\033[0;0m\]] \n\[\033[0;37m\]$(date +%H:%M)\[\
033[0;0m\] $ '

Monday, 31 July 2017

Reverse SSH Tunnelling

References


So you have access to console access on a protected (NAT-ed) network and can reach the whole Internet. You can use a reverse SSH tunnel to get back to using a full featured and fast terminal window instead of the slow graphical console.

In my case I am doing lab exercises for online Linux training in a course provided lab. The lab has Internet access which is great so you can even backup you lab exercises to GitHub for example. However, working through a graphical desktop for terminal work is not desirable with lag, special keys not mapped and dropped keys.   I could not SSH into the lab environment directly so I used a reverse tunnel.


My public SSH server:
  1. only allows access via SSH key. I specifically used "ed25519" key as the public keys are really short, easier to copy out of, especially if you have to type it;
  2. operates on a non-standard port.

On the  Network Protected Client

Create a port forward on the loopback interface of the public server.  Every user with access to the public server can now connect back to the SSH daemon on the protected client.  They still have to authenticate but in my case "student" is not a good password, so be careful.

ssh [-i <identity_file>] [-p <public_port>] -R <local_port>:localhost:22 <user>@<public_server>

Common Server Accessible by Both Parties

Identify a public server that both your workstation and the network protected client can access via SSH.  Enable compression on the inner SSH session as it is the one that has access to the raw text and therefore maximum compression.  There is no point enabling compression on the (outer) reverse tunnel as it only sees the inner encrypted SSH session.

ssh [-C] -p <local_port> <protected_user>@localhost

Friday, 17 February 2017

dokuwiki on Fedora 25 with Docker

dokuwiki on Fedora 25 with Docker

References

Install Docker

dnf config-manager --add-repo https://docs.docker.com/engine/installation/linux/repo_files/fedora/docker.repo
dnf makecache fast
dnf install docker-engine
systemctl start docker
systemctl enable docker
docker run hello-world

Install docuwiki

docker search dokuwiki
docker run --name dokuwiki-data --entrypoint /bin/echo istepanov/dokuwiki Data-only container for dokuwiki.
docker run -d -p 8000:80 --name dokuwiki --volumes-from dokuwiki-data istepanov/dokuwiki
docker container list

Auto-start docuwiki

Create the dokuwiki service file:

cat >/etc/systemd/system/docker-dokuwiki_server.service <<EOT
[Unit]
Description=DokuWiki Container
Requires=docker.service
After=docker.service

[Service]
Restart=always
ExecStart=/usr/bin/docker run -p 8000:80 --name dokuwiki --volumes-from dokuwiki-data istepanov/dokuwiki
ExecStop=/usr/bin/docker stop dokuwiki
ExecStopPost=/usr/bin/docker rm -f dokuwiki

[Install]
WantedBy=default.target
EOT

chown root:root /etc/systemd/system/docker-dokuwiki_server.service
chmod 0644 /etc/systemd/system/docker-dokuwiki_server.service
restorecon -v /etc/systemd/system/docker-dokuwiki_server.service

Enable the dokuwiki service:

systemctl daemon-reload
systemctl start docker-dokuwiki_server.service
systemctl enable docker-dokuwiki_server.service

Use It

Browse to: http://localhost:8000/doku.php?id=start

Backup

Manual backup of the dokuwiki-data container:

docker container exec dokuwiki /bin/tar -cvjf - /var/dokuwiki-storage > /tmp/dokuwiki-data-$(date +%Y%m%d).tar.bz2

Note: only these folders are backed up:
* data/pages/
* data/meta/
* data/media/
* data/media_attic/
* data/media_meta/
* data/attic/
* conf/

Written with StackEdit.

Thursday, 17 November 2016

rsync via SSH proxy

Tested between Fedora 24 (source) and RHEL 7 (destination).
  • The same username is used at both the proxy host and the destination host.
  • The "nc" format for host and port changes with your distribution of linux.
  • Compression is turned off for the intermediate proxy_host leg and turned on for the end-to-end connection with dest_host.
  • To make ssh agent forwarding work, remember to:
    • allow "Agent Forwording" from your ssh client at the source_host (/etc/ssh/ssh_config),
    • allow "Agent Forwarding" on sshd on the proxy_host (/etc/ssh/sshd_config) AND restart sshd.
rsync -avP -e 'ssh -o "ProxyCommand ssh <proxy_host> exec nc %h %p 2>/dev/null"' <user>@<dest_host>:<remote_path> <local_path>


If you configure ~/.ssh/config then you can dramatically shorten the above command:
Host <dest_host_nickname>
        user                    <username>
        GSSAPIAuthentication    no
        Hostname                <dest_host as known by the proxy_host>
        Compression             no
        ForwardAgent            yes
        ProxyCommand ssh -C <proxy_host> exec nc %h %p


...the same rsync command becomes:
rsync -avP <user>@<dest_host_nickname>:<remote_path> <local_path>


Naturally this means you can also SSH straight to the final destination with the same ~/.ssh/config block:
ssh  <user>@<dest_host_nickname>


Code blocks were created by http://markup.su/highlighter/ and pasted into this post while in HTML mode.

Saturday, 16 July 2016

GlusterFS 3.8 on Fedora 24

GlusterFS 3.8 on Fedora 24

References:
- http://gluster.readthedocs.io/en/latest/Quick-Start-Guide/Quickstart/

Environment:
Originally I had all the GlusterFS servers as qemu/kvm VMs on each of the small physical computers. External USB3 docks for attaching multiple bare SATA disks proved to be unreliable and the old Intel NUC had lousy disk performance over USB3, no heavy interrupts just high I/O wait. I had a $42 (auction) HP Desktop (SFF) with 4xSATA ports sitting there. Since the HP desktop only has 2GB RAM I install GlusterFS server on the physical server.

  • 1 subnet, all servers bridged
  • 3 physical servers:
    • Aldi Laptop (8GB RAM, 3.5TB disk – 2 internal SATA, 2 external USB3, Intel(R) Core(TM) i3-2310M CPU @ 2.10GHz)
    • JW mini-ITX (4GB RAM, 3.2TB disk – 2 internal SATA, AMD Athlon(tm) II X3 400e)
    • gfs2: HP Desktop (2GB RAM, 2.6TB disk – 4 internal SATA, Intel(R) Core(TM)2 Quad CPU Q9505 @ 2.83GHz)
  • 2 virtual servers
    • gfs1: (2GB RAM, 10GB(vda), 3TB(vdb), 2 virtual CPUs)
    • gfs3: (2GB RAM, 10GB(vda), 3TB(vdb), 2 virtual CPUs)

With hind-sight and after successfully rebuilding gfs1 and gfs2 nodes a few times on the weekend due to damaged XFS filesystems as a result of USB disks disappearing I will advise:

  1. Be very fusy about your USB3 to SATA docks!
  2. Go physical GlusterFS servers all the way, or go home!
  3. GlusterFS is awesome! I think the stress of rebuilding one node while maintaining a test load broke the second set of USB3 disks but everything recovered! (Thank heavens the disks did not flip/flop, clean death.)

I will rebuild my gfs1 and gfs3 servers as physicals in good time. Probably when I buy bigger disks as 10 disks for ~9TB (raw) is messy and noisy. I am happy that it has been running about 48 hours without issues and under load much of that time.

Finishing Initial Operating System Setup

Configure the network to use Static IPs:

dnf install NetworkManager-tui
nmtui

Register with the local IPA service:

dnf install freeipa-client
ipa-client-install  --enable-dns-updates --mkhomedir --ssh-trust-dns

As much as it pains me, firewall will be configured to allow all traffic. I can revisit later:

systemctl disable firewalld

Update and restart the server:

dnf update
reboot

Install GlusterFS

dnf  install glusterfs-server
systemctl enable glusterd
systemctl start glusterd

Create the GlusterFS Cluster

From gfs1:

gluster peer probe gfs2
gluster peer probe gfs3

From gfs2 or gfs3:

gluster peer probe gfs1

Check that the nodes can see each other:

gluster peer status

Prepare Each Brick on Each GlusterFS Node

As all my GlusterFS nodes are virtual machines for maximum flexibility, I have prepared each node a second virtual disk which will be used directly for the brick’s filesystem, no partitions or volumes. Back at the hypervisor the brick’s device is a LVM2 logical volume configured with “–type striped -i 4 -I 128”. So no redundancy within each brick. Striping across multiple disks multiples I/O performance by the number of disks. Don’t just make a “linear” volume because it is easy and the default.

mkfs.xfs -L gfs1_br1 /dev/vdb
mkdir -p /data/glusterfs/gfsVol01/brick01
echo '/dev/vdb  /data/glusterfs/gfsVol01/brick01    xfs noatime 0 0' >> /etc/fstab
mount /data/glusterfs/gfsVol01/brick01

Configure a Volume

STOP – all nodes and all bricks must be configured before proceeding to create a GlusterFS Volume.

gluster peer status
gluster volume create gv0 replica 3 gfs1:/data/glusterfs/gfsVol01/brick01/brick gfs2:/data/glusterfs/gfsVol01/brick01/brick gfs3:/data/glusterfs/gfsVol01/brick01/brick
gluster volume start gv0
gluster volume info

Test the Volume

For the test just mount the volume on one of the nodes and start copying files into it:

mount -t glusterfs server1:/gv0 /mnt
cp -av /var /mnt

Check the files are being replicated on each of the other nodes:

find /data/glusterfs/gfsVol01/brick01/brick -ls

Add a Client

Same as mounting the volume for testing on the server:

mount -t glusterfs gfs1:/gv0 /mnt/gv0

Written and Published with StackEdit.

Saturday, 2 July 2016

iSCSI Example on RHEL 7.2

iSCSI Example on RHEL 7.2

Servers:
- iSCSI Target: akoya.spurrier.net.au – 192.168.1.26
- iSCSI Initiator: nuc1.spurrier.net.au – 192.168.1.27

Install iSCSI Target and Configure the Firewall

On each server:

subscription-manager register
subscription-manager attach --pool=8a85f98153dab2f00153dea83bf25daf
subscription-manager repos --enable rhel-7-server-rpms
yum make clean
yum repolist
yum groupinstall base
yum update
systemctl reboot

yum install firewalld
systemctl start firewalld.service
systemctl status firewalld.service
systemctl enable firewalld.service
firewall-cmd --permanent --add-service iscsi-target
firewall-cmd --reload

iSCSI Target – akoya.spurrier.net.au – 192.168.1.26

Ultimately I plan to try Gluster on this node but for now I want to practice with iSCSI so I created the future Gluster Brick below but instead used if as the backend to an iSCSI target. Sorry for any confusion.

Clean up “sdb” to use for the iSCSI target’s storage backend. (It had a Fedora install on it.)

pvs
fdisk -l /dev/sda
fdisk -l /dev/sdb
vgs  
lvs  
mount
# unmount any file systems on the disk to be repurposed.
pvs  
vgscan
vgchange -an fedora
pvremove /dev/sdb2 --force --force
# delete all partitions of the sdb disk.
fdisk /dev/sdb
pvcreate /dev/sdb
pvs  
vgcreate akoya_gfs1 /dev/sdb
lvcreate -l 100%FREE -n brick1 akoya_gfs1

We have an unformatted block device at /dev/akoya_gfs1/brick1. Get the iSCSI Initiator Name for the Target’s ACL before you begin. (See the first step in the next server’s block.) Lets make an iSCSI Target:

ll /dev/akoya_gfs1/
firewall-cmd --permanent --add-service iscsi-target
firewall-cmd --reload
yum install targetcli
systemctl start target
systemctl enable target
targetcli
    cd backstores/block
    create name=brick1 dev=/dev/akoya_gfs1/brick1
    cd ../../iscsi
    delete iqn.2003-01.org.linux-iscsi.akoya.x8664:sn.5bdc844021fa
    create iqn.2016-06.net.spurrier.akoya:gfs1-brick1
    cd iqn.2016-06.net.spurrier.akoya:gfs1-brick1/tpg1/luns
    create /backstores/block/brick1
    cd ../acls
    create iqn.1994-05.com.redhat:ff8456a7e3e0
    exit

iSCSI Initiator – nuc1.spurrier.net.au – 192.168.1.27

Check the iSCSI Initiator Name for adding to the ACL on the iSCSI Target (see above, iqn.1994-05.com.redhat:ff8456a7e3e0).

cat /etc/iscsi/initiatorname.iscsi 
    InitiatorName=iqn.1994-05.com.redhat:ff8456a7e3e0

Connect to the iSCSI Target:

yum install iscsi-initiator-utils
iscsiadm -m discovery -t st -p akoya
    192.168.1.26:3260,1 iqn.2016-06.net.spurrier.akoya:gfs1-brick1

iscsiadm -m node -T iqn.2016-06.net.spurrier.akoya:gfs1-brick1 -l

Confirm the iSCSI disk is “sdb”, format and mount:

ll /dev/sd*
fdisk -l /dev/sdb
fdisk -l /dev/sda
mkfs.xfs -L akoya_gfs1 /dev/sdb
mount /dev/sdb /mnt

Test by coping the root file system (/) to the mounted iSCSI volume:

df -h
mkdir /mnt/backup-nuc1
rsync -avPx / /mnt/backup-nuc1/
sync

(I threw in the “sync” as the root file system was so small (3GB) the writes were cached in RAM (16GB) and I had not seen any meaningful traffic with iotop. Yes the transfer rate was at my full 1Gb Ethernet speed.)

Written with StackEdit.

IPA with Replica on RHEL 7.2

IPA with Replica on RHEL 7.2

Registering Clients to IPA

yum install ipa-client
KRB5_TRACE=/dev/stdout ipa-client-install  --enable-dns-updates --mkhomedir --ssh-trust-dns --force-join
systemctl reboot

Building the IPA Cluster

Servers:

Install IPA and Configure the Firewall

On each server:

subscription-manager register
subscription-manager attach --pool=8a85f98153dab2f00153dea83bf25daf
subscription-manager repos --enable rhel-7-server-extras-rpms --enable rhel-7-server-rpms
yum make clean
yum repolist
yum groupinstall base
yum update
systemctl reboot
    
yum install firewalld
systemctl start firewalld.service
systemctl status firewalld.service
systemctl enable firewalld.service
firewall-cmd --permanent --add-port={80/tcp,443/tcp,389/tcp,636/tcp,88/tcp,464/tcp,53/tcp,88/udp,464/udp,53/udp,123/udp}
firewall-cmd --reload

yum install ipa-server bind bind-dyndb-ldap ipa-server-dns

On akoya.spurrier.net.au – 192.168.1.26

hostname
ipa-server-install -r SPURRIER.NET.AU -n spurrier.net.au  --setup-dns --forwarder=192.168.1.1 --mkhomedir --ip-address=192.168.1.26 --ssh-trust-dns
kinit admin
/usr/sbin/ipa-replica-conncheck --replica nuc1.spurrier.net.au
ipa-replica-prepare nuc1.spurrier.net.au --ip-address 192.168.1.27
scp /var/lib/ipa/replica-info-nuc1.spurrier.net.au.gpg root@nuc1:

On nuc1.spurrier.net.au – 192.168.1.27

hostname
ipa-replica-conncheck --master akoya.spurrier.net.au
ipa-replica-install --mkhomedir --ip-address=192.168.1.27 --ssh-trust-dns --setup-dns --forwarder=192.168.1.1 /root/replica-info-nuc1.spurrier.net.au.gpg

Saturday, 28 November 2015

Satellite 6.1 on RHEL 6

Really, really reconsider running Satellite 6 on RHEL 6.  While technically Red Hat support it there are just too many performance reasons to ignore RHEL 7.  Get your SOE updated to RHEL 7 if you have to before going with Satellite 6. 
-------

subscription-manager clean
subscription-manager register
subscription-manager list --available | tee /root/subs.avail
sed -n '/^Subscription Name:   Red Hat Satellite$/,/^Pool ID:/ p' /root/subs.avail
subscription-manager attach --pool=<satellite_pool_id>
subscription-manager release --set=6Server
subscription-manager repos --disable=*

Repositories to subscribe to for RHEL 6.
subscription-manager repos
--enable rhel-6-server-rpms --enable rhel-server-rhscl-6-rpms --enable rhel-6-server-satellite-6.1-rpms

yum repolist
yum remove java*
yum update


iptables -A INPUT -m state --state NEW -p udp --dport 53 -j ACCEPT \
&& iptables -A INPUT -m state --state NEW -p tcp --dport 53 -j ACCEPT \
&& iptables -A INPUT -m state --state NEW -p udp --dport 67 -j ACCEPT \
&& iptables -A INPUT -m state --state NEW -p udp --dport 68 -j ACCEPT \
&& iptables -A INPUT -m state --state NEW -p udp --dport 69 -j ACCEPT \
&& iptables -A INPUT -m state --state NEW -p tcp --dport 80 -j ACCEPT \
&& iptables -A INPUT -m state --state NEW -p tcp --dport 443 -j ACCEPT \
&& iptables -A INPUT -m state --state NEW -p tcp --dport 5647 -j ACCEPT \
&& iptables -A INPUT -m state --state NEW -p tcp --dport 8140 -j ACCEPT \
&& iptables-save > /etc/sysconfig/iptables

service iptables start
chkconfig iptables on


init 6

yum install katello

katello-installer --foreman-initial-organization "Spud" \
--foreman-initial-location "Private"
 

Could not set 'present' on ensure: 422 Unprocessable Entity at 12:/usr/share/katello-installer/modules/foreman_proxy/manifests/register.pp
Found my answer here.  It really does seem to be an issue for some KVM test rigs:
http://unixrevolution.blogspot.com.au/2015/09/satellite-6-installation-issues.html
Resolution: 
foreman-rake config -- -k idle_timeout -v 60
foreman-rake config -- -k proxy_request_timeout -v 99

katello-installer --foreman-initial-organization "Spud" \
--foreman-initial-location "Private"